Intro
To not be confused, these are not API tests. As title says, this guide will show you how to build API client using Ruby and export it as a gem. This type of client is often needed for some testing purposes. API client in this guide will use server created in my other guide, React Gin Blog (RGB). No knowledge from that guide is needed. I have also created additional API endpoints and data model for post comments, which is not available in original RGB guide. You only need to know few details that will be explained right now. There are 3 models in database, user, post and comment. User is used for authorization and can have multiple posts. Post can have multiple comments. Authorization is done using “Authorization” header with value “Bearer #{JWT}”. Routes with corresponding JSON structure in request and response are:
POST /api/signin- request
{ "Username": "", "Password": "" }
- response
{ "jwt": "generated_JWT", "msg": "Signed in successfully." }
- request
GET /api/posts- response
{"data":[{"ID":0,"Title":"","Content":"","CreatedAt":"","ModifiedAt":"}],"msg":"Posts fetched successfully."}
- response
POST /api/posts- request
{ "Title": "", "Content": "" }
- response
{"data":{"ID":0,"Title":"","Content":"","CreatedAt":"","ModifiedAt":""},"msg":"Post created successfully."}
- request
DELETE /api/posts/:id- response
{ "msg": "Post deleted successfully." }
- response
GET /api/posts/:id/comments- response
{"data":[{"ID":0,"Content":"","CreatedAt":"","ModifiedAt":"}],"msg":"Post comments fetched successfully."}
- response
POST /api/posts/:id/comments- request
{ "Content": "" }
- response
{"data":{"ID":0,"Content":"","CreatedAt":"","ModifiedAt":""},"msg":"Post comment created successfully."}
- request
Now that we have sorted that out, let’s continue. Now, why would we want to build API client for testing anyway? Let’s imagine that we are creating Selenium automated tests for our RGB Web app. We could also have RGB mobile app that needs Appium automated tests. When writing those type of tests, we often have need for some prerequisite data to be available on backend for specific test case. And for that we will use our API client. For example if we want to develop test case that will list all user’s posts, we can create whatever number of posts we want through API and then run our test case and make it to expect all created posts.
HTTP client
We will start by creating our custom client module that will use Ruby httpclient gem. Besides that, we will use gems httplog, logger and json. You can install them all by running:
gem install httpclient
gem install httplog
gem install logger
gem install json
You can find more information about these gems on their GitHub repositories:
- https://github.com/nahi/httpclient
- https://github.com/trusche/httplog
- https://github.com/ruby/logger
- https://github.com/flori/json
Now we should create directory for our project. I will create new directory and call it rgb_api_client. In that directory I will create new file rgb_client.rb and define RGBClient module. That module will extend self so we can use all defined methods as module instance methods. This file looks like this:
require 'httpclient'
require 'httplog'
require 'json'

module RGBClient
  extend self

  TIMEOUT = 60
  HEADERS = {
    "Accept-Encoding" => "gzip, deflate, br",
    "User-Agent" => "RGB API Client",
    "Content-Type" => "application/json;charset=UTF-8",
    "Accept" => "application/json, text/plain, */*",
    "Connection" => "keep-alive",
  }

  class AuthorizationError < Exception; end
  class RGBAPIError < Exception; end

  def init(url:, log_file: "rgb_api_client.log")
    @@base_url = url
    @@client = HTTPClient.new(default_header: HEADERS)
    @@client.send_timeout = TIMEOUT

    @@logger = Logger.new(log_file)
    @@logger.level = :debug

    HttpLog.configure { |config|
      config.logger = @@logger
    }

    return self
  end

  def get(path, body = nil, header = {})
    @@client.get @@base_url + path, body, header
  end

  def post(path, body = nil, header = {})
    @@client.post @@base_url + path, body, header
  end

  def put(path, body = nil, header = {})
    @@client.put @@base_url + path, body, header
  end

  def delete(path, body = nil, header = {})
    @@client.delete @@base_url + path, body, header
  end

  def authorize(username:, password:)
    body = { Username: username, Password: password }.to_json
    response = post "/api/signin", body

    raise AuthorizationError.new if response.status != 200

    res_body = parse_body(response)

    log_and_raise(response: response, msg: "Authorization failed.") if res_body["msg"] != "Signed in successfully." or res_body["jwt"].nil? or res_body["jwt"] == ""

    @@jwt = res_body["jwt"]
    @@client.default_header.merge!({ "Authorization" => "Bearer #{@@jwt}" })

    return self
  end

  def parse_body(response)
    JSON.parse response.body
  end

  def log_response(response)
    @@logger.error {
      "Status code: #{response.status}. " +
      "Headers:\n#{response.headers}. " +
      "Body:\n#{parse_body(response)}"
    }
  end

  def log_and_raise(response:, msg:)
    log_response(response)
    raise RGBAPIError.new(msg)
  end
end
Let’s break down this code. On the top of the module code, default timeout and headers are defined as constants.
After that you can see 2 classes with errors. Authorization is first step we will always have to do when using this client, so if that fails, AuthorizationError exception will be raised. All other API calls will fail with RGBAPIError exception if expected response is not received.
In init method client is initialized for given url and optional path to log_file. HTTPClient and Logger objects are created here which will be used for sending HTTP requests and logging them.
Defined HTTPClient instance have methods for all HTTP requests (GET, POST, PUT, DELETE…), and these methods are wrapped in custom get, post, put and delete methods.
Method authorize will be used for authorizing user on backend and fetching JWT needed for all other API requests. Fetched JWT is saved to module variable @@jwt and new Authorization header is added to client.
Method parse_body is helper method which will be used to parse JSON response and convert it to Ruby hash.
If something fails or unexpected response is received, we want to log that and raise exception. Method log_response will log response status, headers and body, while log_and_raise will log response before raising RGBAPIError exception.
As you can see, methods init and authorize are returning self. That’s so we can initialize and authorize client in one line like this:
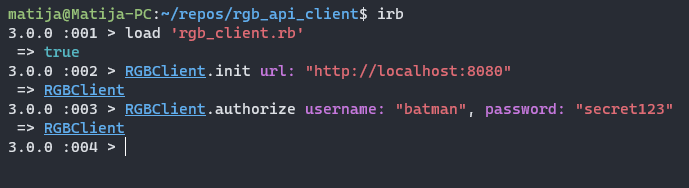
client = RGBClient.init(url: "http://www.example.com").authorize(username: "username", password: "password")
I have already created test user in database so now I can initialize and authorize created client:
API calls
Now that client is implemented, we can start implementing API calls. Let’s see how can we do that. As we said, this client will be mainly used to support some automated tests. And in that case we often need to save values we send to backend so we can verify them in tests. And we don’t want to save these values in a bunch of variables, so we will save them in objects. First, let’s create new file called rgb_api.rb. Here we will define only main class RGBAPI that will include created RGBClient:
class RGBAPI
  include RGBClient
end
All other classes will inherit this main class. Now we are ready to create class Post which will be used to store data about post and to send post API requests.
class Post < RGBAPI
  attr_reader :id, :title, :content

  def initialize(**args)
    @id = args[:id]
    @title = args[:title]
    @content = args[:content]
  end

  def create()
    body = { Title: @title, Content: @content }.to_json
    response = post "/api/posts", body
    res_body = parse_body(response)
    log_and_raise(response: response, msg: "Failed to create post.") if response.status != 200 or res_body["msg"] != "Post created successfully."
    @id = res_body["data"]["ID"]
    return self
  end
end
This class has a constructor that receives hash arguments. Usually we will create this object with title: and content: arguments. Next we have a create method used to actually send API request and create post on backend. If request is not successful, exception will be raised, otherwise we save returned ID to @id class attribute. That code can now be used in this way:
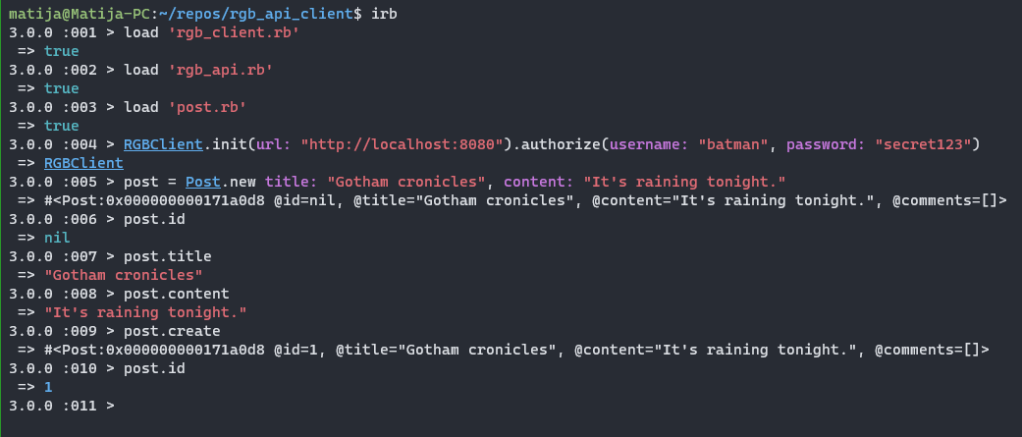
As you can see in the picture above, first we create Post object with given title and content and then save it to variable post. Now we have all that data saved in one variable and it’s accessible using getters created with attr_reader. Notice how ID is nil before creating post on backend, and after creation it has a value.
After test is done, we want to clear created resources. To do that, add method destroy to class Post which will delete post from database.
def destroy()
  response = delete "/api/posts/#{@id}"
  res_body = parse_body(response)
  log_and_raise(response: response, msg: "Failed to delete post.") if response.status != 200 or res_body["msg"] != "Post deleted successfully."
  @id = nil
end
Method destroy is almost the same as create. Only differences are that we are calling delete which doesn’t require body instead of post, checking for slightly different message and setting @id attribute back to nil.

API call for fetching all user posts could also be useful, so we will add method to handle that. Since this method will return array of Post objects, it doesn’t make sense to add it into that class. So methods like this, that are returning list of top-level resources, will be added to main RGBAPI class.
class RGBAPI
  include RGBClient

  def fetch_posts()
    response = get "/api/posts"
    res_body = parse_body(response)
    log_and_raise(response: response, msg: "Failed to list user posts.") if response.status != 200 or res_body["msg"] != "Posts fetched successfully."
    res_body["data"].map { |post| Post.new id: post["ID"], title: post["Title"], content: post["Content"] }
  end
end
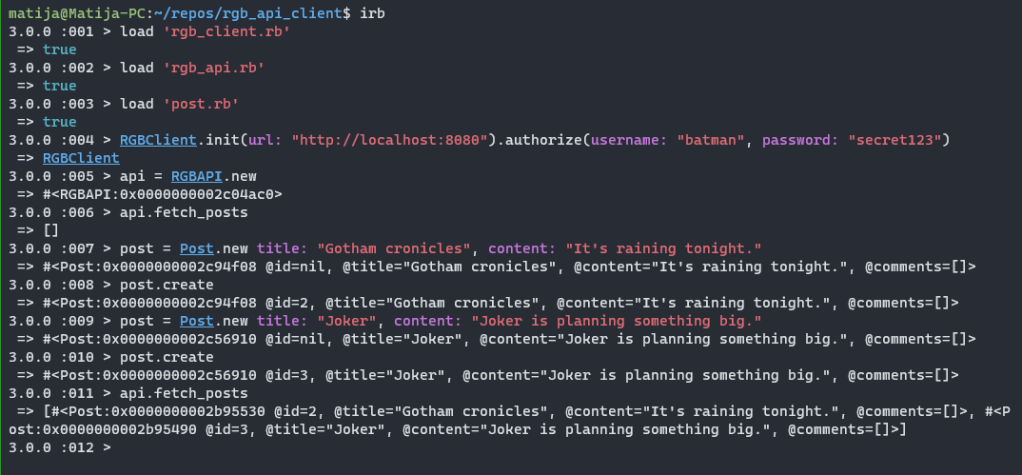
When JSON with list of posts is fetched, iterate through it and create Post objects with fetched values. Using this in action looks like this:
With API calls for posts handled, we can move on to comments. Same as before, we will create new class called Comment which will inherit RGBAPI class. Constructor is also created in the same way, with one minor difference. Here we have additional argument post: which will be used to save Post object representing post resource in database that will actually contain this comment. Method create is also pretty much the same as in Post class, with few differences. One is that we are using ID of parent Post in URL. Also, since we defined getter post method, we must call RGBClient.post explicitly, otherwise getter will be called.
class Comment < RGBAPI
  attr_reader :id, :post, :content

  def initialize(**args)
    @id = args[:id]
    @post = args[:post]
    @content = args[:content]
  end

  def create()
    body = { Content: @content }.to_json
    response = RGBClient.post "/api/posts/#{@post.id}/comments", body
    res_body = parse_body(response)
    log_and_raise(response: response, msg: "Failed to create post comment.") if response.status != 200 or res_body["msg"] != "Post comment created successfully."
    @id = res_body["data"]["ID"]
    return self
  end
end
This class is now ready to use:
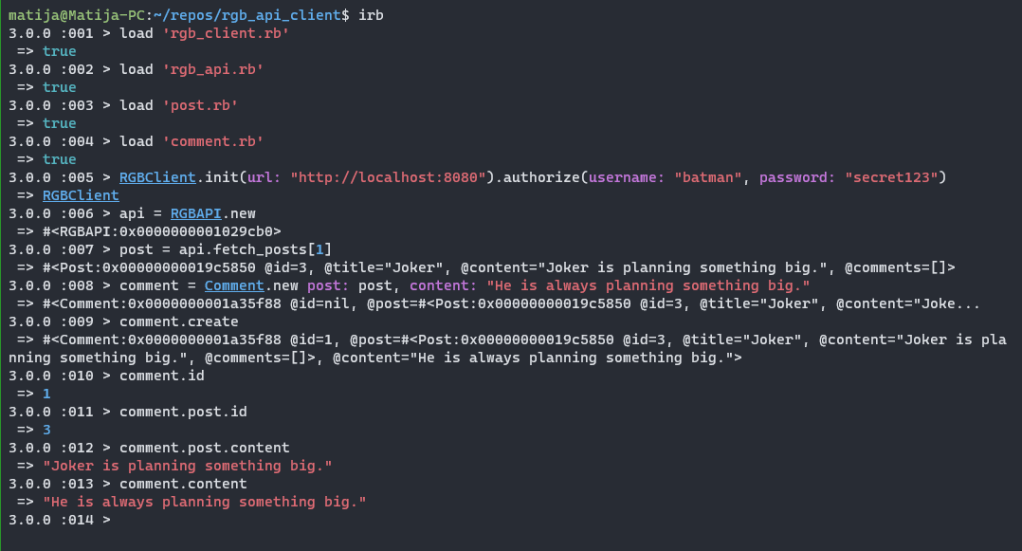
By implementing classes this way, we have Comment connected with Post which it belongs to.
Since Comment class is implemented, now it’s possible to add one more method to Post class. That new method will be called fetch_comments and it will send API request to get all comments for this post and it will return array of Comment objects belonging to that Post. New attribute @comments will be created, alongside with getter method. That attribute will return array of Comment objects belonging to that post.
class Post < RGBAPI
  attr_reader :id, :title, :content, :comments

  def initialize(**args)
    @id = args[:id]
    @title = args[:title]
    @content = args[:content]
    @comments = []
  end

  # def create()
  # ...

  # def destroy()
  # ...

  def fetch_comments()
    response = get "/api/posts/#{@id}/comments"
    res_body = parse_body(response)
    log_and_raise(response: response, msg: "Failed to list post comments.") if response.status != 200 or res_body["msg"] != "Post comments fetched successfully."
    @comments = res_body["data"].map { |comment| Comment.new post: self, id: comment["ID"], content: comment["Content"] }
  end
end
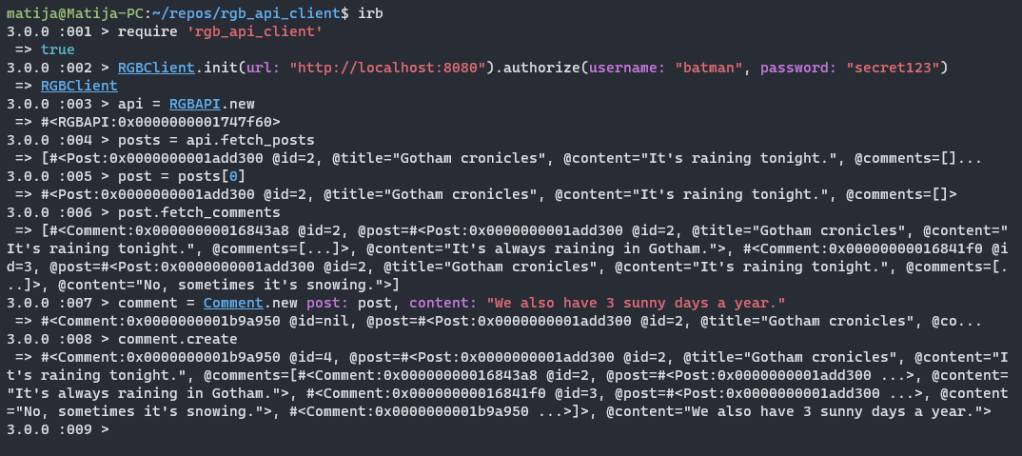
Let’s see how we can use this method. As you can notice in the picture below, list of comments is empty at the beginning. After we create comment for that post, we can fetch all comments again. After that newly created comment is visible in @comments attribute.

Overriding Ruby’s new method
Method fetch_comments from last example is great for fetching already created comments on specific post. But, as we saw in that last example, newly created comment is not added to list of comments immediately. More specifically, created Comment object is not added to @comments attribute in Post object which it belongs to on creation. We had to call fetch_comments to store all comments in that attribute. Wouldn’t be great to store this Comment object to Post @comments attribute immediately upon creation? Currently we are unable to do that, since self reference is not yet available in initialize constructor. To do that, we will override Ruby’s new method. Let’s first see how new method actually works. As you probably know, in Ruby we are creating new objects using new method, but constructor is actually called initialize. So what connects them? Well, Ruby actually automatically creates new method for every class. For class Comment it would look something like this:
def self.new(**args)
  comment = allocate
  comment.send(:initialize, **args)
  comment
end
This method will allocate space in memory for newly created Comment object and store reference to that object, then it will call initialize method passing it received arguments and lastly it will return created reference.
So how can we use this to our advantage and store newly created Comment object in Post @comments attribute? Well, first we will add new method to Post class called add_comment which will only receive Comment object reference and it to @comments array. It’s pretty simple method:
def add_comment(comment)
  @comments.push(comment)
end
After that, just override new method in Comment class like this:
def self.new(**args)
  comment = allocate
  args[:post].add_comment(comment)
  comment.send(:initialize, **args)
  comment
end
Here we add only one line. What this line does is to call add_comment method on passed Post object by passing it reference of newly created Comment object.

As you can see on the image above, now newly created Comment object is added to array of comments in parent Post object immediately. ID of that object is still nil before it’s created in database, but after that, ID is set to correct value as before.
Wrapping everything as a Ruby gem
Now when we have API client implemented, we want to make it into gem, so it’s reusable in various projects. Also when we add something new or change something, this way we will have to change it only in place and just build and install new version of gem. This section will explain how exactly to do that.
To be able to create Ruby gem from our code, everything should be in lib directory. So create lib directory inside project root directory. After that, inside lib directory create new file named rgb_api_client.rb and directory with name rgb_api_client. This will actually be name of the gem. This gem will be included in other code by calling require rgb_api_client. When that is executed, Ruby will call this newly created file rgb_api_client.rb. So the only thing we will do here is to require all other files used in this gem. Now we will move rgb_client.rb file to rgb_api_client directory and remove all require lines from that file. Also, inside the same directory, we will create new directory called rgb_api and move rgb_api.rb, post.rb and comment.rb files there. Lastly, create new file inside lib directory called rgb_api_client.gemspec. That .gemspec file is used to build gem before installing it.
Directory structure of whole project should now look like this:

Notice that in rgb_api_client.rb, first required file after rgb_client is rgb_api. That’s because RGBAPI is main class, and other classes are inherited from it, so file with this class must be required before files containing subclasses.
module RGBAPIClient
  require 'httpclient'
  require 'httplog'
  require 'logger'
  require 'json'
  require 'rgb_api_client/rgb_client'
  require 'rgb_api_client/rgb_api/rgb_api'
  require 'rgb_api_client/rgb_api/comment'
  require 'rgb_api_client/rgb_api/post'
end
And rgb_api_client.gemspec contains:
Gem::Specification.new do |s|
  s.name        = 'rgb_api_client'
  s.version     = '0.0.1'
  s.summary     = 'RGB Web API client.'
  s.description = "Test client used to communicate with RGB Web API."
  s.authors     = ['Matija Krajnik']
  s.email       = 'matija.krajnik90@gmail.com'
  s.license     = 'Nonstandard'
  s.homepage    = 'https://github.com/matijakrajnik/rgb_api_client'
  s.files       = [
    'lib/rgb_api_client.rb',
    'lib/rgb_api_client/rgb_client.rb'
  ] + Dir['lib/rgb_api_client/rgb_api/*.rb']

  s.add_runtime_dependency 'httpclient', '~> 2.8', '>= 2.8.3'
  s.add_runtime_dependency 'httplog', '~> 1.5', '>= 1.5.0'
  s.add_runtime_dependency 'logger', '~> 1.5', '>= 1.5.1'
  s.add_runtime_dependency 'json', '~> 2.6', '>= 2.6.2'
end
To build rgb_api_client gem, run
gem build rgb_api_client.gemspecThat will create new file rgb_api_client-0.0.1.gem which is used to install gem. Install it with command
gem install rgb_api_client-0.0.1.gemNow you can simply require 'rgb_api_client' in your code and use created client.
And that’s it. Whole code can be found in GitHub repo. You are now ready to write your own API client. Have fun 🙂
